Boa noite! Estou desenvolvendo meu primeiro projeto no home-assistant no qual utilizo o NodeMCU ESP8266-12E com os seguintes sensores:
- DHT11
- ADS1115
- LDR
- MQ7
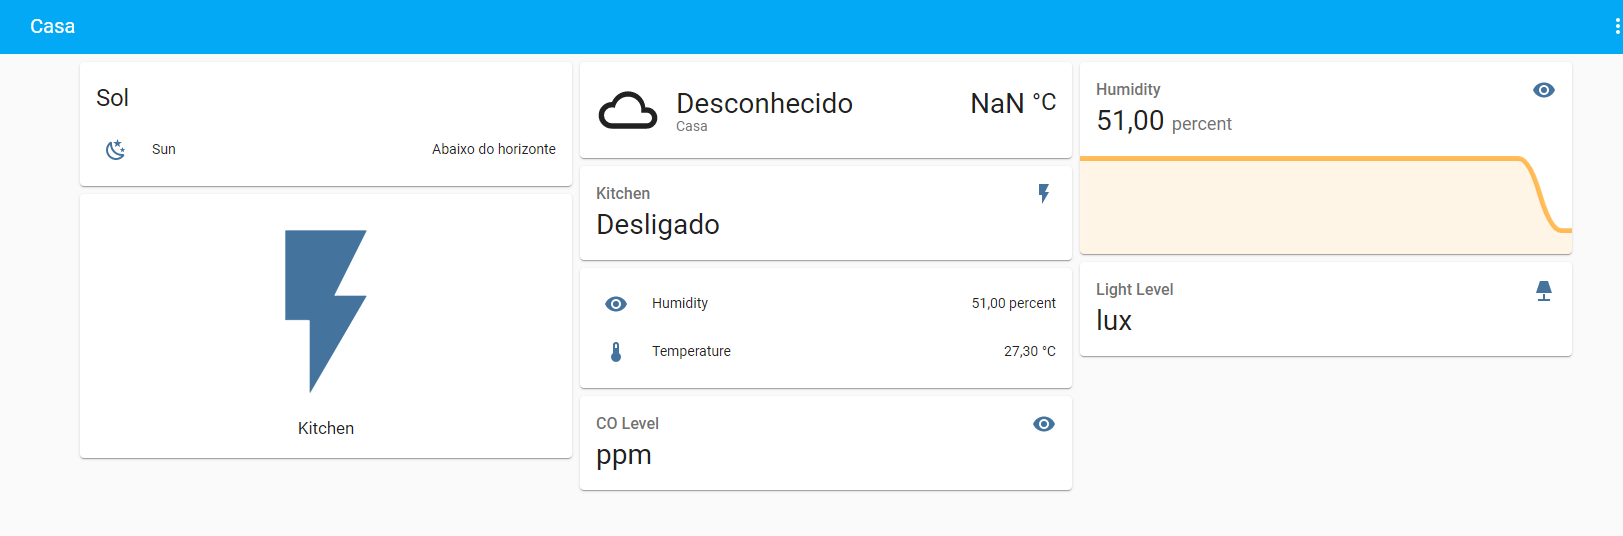
Estou conectando o MQ7 e LDR no ADS1115 para ler os valores analógicos. O intuito do programa é inicialmente ler as medidas dos sensores via MQTT e futuramente acrescentarei o acionamento. Porém não estou conseguindo fazer a leitura do ADS1115, alguém é familiarizado com o mesmo?
#include <ESP8266WiFi.h>
#include <PubSubClient.h>
#include "DHT.h"
#include <Adafruit_ADS1X15.h>
Adafruit_ADS1115 ads;  /* Use this for the 16-bit version */

#define wifi_ssid "Acibnet"
#define wifi_password "33423550"

#define mqtt_server "192.168.0.104"
#define mqtt_user "mqttuser"
#define mqtt_password "1234"

#define temperature_topic "sensor/temperature"
#define humidity_topic "sensor/humidity"
#define light_topic "sensor/light"
#define gas_topic "sensor/gas"

float val = 0;
float light_level = 0, sensorgas_level = 0;

//Buffer to decode MQTT messages
char message_buff[100];

long lastMsg = 0;
long lastRecu = 0;
bool debug = false;  //Display log message if True

#define DHTPIN D6
#define DHTTYPE DHT11

// Create abjects
DHT dht(DHTPIN, DHTTYPE);
WiFiClient espClient;
PubSubClient client(espClient);

void setup() {
  Serial.begin(9600);
  pinMode(D8,OUTPUT);     //Pin 2 for LED
  setup_wifi();           //Connect to Wifi network
  client.setServer(mqtt_server, 1883);    // Configure MQTT connexion
  client.setCallback(callback);           // callback function to execute when a MQTT message
  dht.begin();
}

//Connexion WiFi
void setup_wifi() {
  delay(10);
  Serial.println();
  Serial.print("Connecting to ");
  Serial.println(wifi_ssid);

  WiFi.begin(wifi_ssid, wifi_password);

  while (WiFi.status() != WL_CONNECTED) {
    delay(500);
    Serial.print(".");
  }

  Serial.println("");
  Serial.println("WiFi OK ");
  Serial.print("=> ESP8266 IP address: ");
  Serial.print(WiFi.localIP());
}

//Reconnexion
void reconnect() {

  while (!client.connected()) {
    Serial.print("Connecting to MQTT broker ...");
    if (client.connect("ESP8266Client", mqtt_user, mqtt_password)) {
      Serial.println("OK");
    } else {
      Serial.print("KO, error : ");
      Serial.print(client.state());
      Serial.println(" Wait 5 secondes before to retry");
      delay(5000);
    }
  }
}

void loop() {
  if (!client.connected()) {
    reconnect();
  }
  client.loop();

  long now = millis();
  // Send a message every minute DHT11
  if (now - lastMsg > 1000 * 60) {
    lastMsg = now;
    // Read humidity
    float h = dht.readHumidity();
    // Read temperature in Celcius
    float t = dht.readTemperature();

    // Oh, nothing to send
    if ( isnan(t) || isnan(h)) {
      Serial.println("KO, Please chez DHT sensor !");
      return;
    }

    if ( debug ) {
      Serial.print("Temperature : ");
      Serial.print(t);
      Serial.print(" | Humidity : ");
      Serial.println(h);
    }
    client.publish(temperature_topic, String(t).c_str(), true);   // Publish temperature on temperature_topic
    client.publish(humidity_topic, String(h).c_str(), true);      // and humidity
  }

  //Final DHT11

  //Send a message every minute LDR
    if (now - lastMsg > 1000 * 60) {
    lastMsg = now;
    // Read light
    for(int i = 0 ;i <10; i++){
       light_level = ads.readADC_SingleEnded(0);
         val = val + light_level;
        delay(100);
      }
    light_level = val/10;

    // Oh, nothing to send
    if ( isnan(light_level)) {
      Serial.println("KO, Please chez DHT sensor !");
      return;
    }

    if ( debug ) {
       Serial.println(light_level);
    }
    client.publish(light_topic, String(light_level).c_str(), true);   // Publish light on light_topic

  }

  //Final LDR

   //Send a message every minute MQ7
    if (now - lastMsg > 1000 * 60) {
    lastMsg = now;
    // Read light
    for (int number = 0; number < 10; number++)
{
  sensorgas_level = ads.readADC_SingleEnded(3);
  val = val + sensorgas_level;
  delay(100);
}

sensorgas_level = val/10;

    // Oh, nothing to send
    if ( isnan(sensorgas_level)) {
      Serial.println("KO, Please chez DHT sensor !");
      return;
    }

    if ( debug ) {
      Serial.println(sensorgas_level);
    }
    client.publish(gas_topic, String(sensorgas_level).c_str(), true);   // Publish gas on gas_topic

  }

  //Final MQ7

  if (now - lastRecu > 100 ) {
    lastRecu = now;
    client.subscribe("homeassistant/switch1");
  }
}

// MQTT callback function
// D'après http://m2mio.tumblr.com/post/30048662088/a-simple-example-arduino-mqtt-m2mio
void callback(char* topic, byte* payload, unsigned int length) {

  int i = 0;
  if ( debug ) {
    Serial.println("Message recu =>  topic: " + String(topic));
    Serial.print(" | longueur: " + String(length,DEC));
  }
  // create character buffer with ending null terminator (string)
  for(i=0; i<length; i++) {
    message_buff[i] = payload[i];
  }
  message_buff[i] = '\0';

  String msgString = String(message_buff);
  if ( debug ) {
    Serial.println("Payload: " + msgString);
  }

  if ( msgString == "ON" ) {
    digitalWrite(D8,HIGH);
  } else {
    digitalWrite(D8,LOW);
  }
}
# Configure a default setup of Home Assistant (frontend, api, etc)
default_config:

# Text to speech
tts:
  - platform: google_translate

group: !include groups.yaml
automation: !include automations.yaml
script: !include scripts.yaml
scene: !include scenes.yaml

mqtt:
  broker: 192.168.0.104   #if broker installed on the same computer than Home-Assistant
  port: 1883          #by default
  client_id: home-assistant-1
  keepalive: 60
  username: "mqttuser" #optional
  password: '1234' #optional;
  protocol: 3.1      #by default

sensor:
  platform: mqtt
  state_topic: "sensor/temperature"
  name: "Temperature"
  qos: 0
  unit_of_measurement: "°C"
  #value_template: '{{ payload }}'

sensor 2:
  platform: mqtt
  state_topic: "sensor/humidity"
  name: "Humidity"
  qos: 0
  unit_of_measurement: "percent"
  #value_template: '{{ payload }}'

sensor 3:
  platform: mqtt
  state_topic: "sensor/light"
  name: "Light Level"
  qos: 0
  unit_of_measurement: "lux"
  #value_template: '{{ payload }}'

sensor 4:
  platform: mqtt
  state_topic: "sensor/gas"
  name: "CO Level"
  qos: 0
  unit_of_measurement: "ppm"
  #value_template: '{{ payload }}'

switch:
  platform: mqtt
  name: "Kitchen"
  command_topic: "homeassistant/switch1" #Topic sur lequel on publie l'état de l'interrupteur
  payload_on: "ON"   # A vous de choisir le message envoyé lorsque l'interrupteur est allumé
  payload_off: "OFF" # et éteint
  optimistic: true   # Mettez à true pour maintenir l'état
  qos: 0
  retain: true
  value_template: '{{ value.x }}'